
Reading time: min
How to Create and Monetize a Blog for Free with Systeme.io (Full Tutorial)
Blogging remains a powerful tool to reach your future customers around the world:

Some 2024 statistics about bloggin - Source: DemandMetric
Can you believe it? Those numbers are huge!
Most of your future customers want to read your content on a blog before they trust you and buy your products...
So, are you ready to start a blog? Or just curious about one of the underrated features of Systeme.io?
Either way, you're in the right place because I’m going to show you how to create a profitable blog:
- No need for plugins
- No need for technical skills
- No need to pay for hosting
- No need for a webmaster every time you want to add a page
With this practical guide, you'll be able to create your own blog in just a few simple steps.
And all thanks to the most straightforward and cheapest marketing tool in the world: Systeme.io!
Spoiler: You don’t even need a paid subscription to generate revenue with a professional blog 👀
What is a Blog, and Why Do You Need One?
Why Use Systeme.io to Create a Blog?
How Much Can You Earn with a Systeme.io Blog?
Step 1: Sign Up for Systeme.io
Step 2: Connect a Domain Name and Professional Email to Systeme.io
Step 3: Create Your Blog on Systeme.io
Step 4: Customize Your Systeme.io Blog Design
Customize the global settings of your Systeme.io blog:
Remove the Affiliate Badge from your Systeme.io Blog:
Step 5: Understand Blog Pages vs. Blog Posts/Articles on Systeme.io
What's a Systeme.io Blog Pages:
What's a Systeme.io Blog Post/Article:
Why Posts and Pages are Important for Your Systeme.io Blog:
Step 6: Add and Customize Content on Your Systeme.io Blog
Settings to Adjust on Your Blog Pages:
Add a Blog Post on Systeme.io:
Step 7: Optimize Your Blog for SEO and Engagement
Step 8: Grow Your Blog with Systeme.io
Systeme.io Blog and Email Marketing:
Systeme.io Blogs and Sales Funnels:
Systeme.io Blogs and Memberships:
What is a Blog, and Why Do You Need One?
A blog is the oldest tool in terms of internet marketing.
Before, solopreneurs like us didn’t have social media or sales funnels. So, they attracted customers to their blogs.
So, what is a blog?
It’s a place on the internet where you can regularly write articles to provide value, explain a concept, give your opinion, etc. It can be part of your website, like on Systeme.io: there's a sales section and a blog section.
A blog helps you get visibility because it appears on Google when your prospects search for something.
For example, you sell courses on growing tomatoes. Your prospects search for "how to grow tomatoes" to find advice, and boom, they land on your blog. You provide tons of tips and also offer a free guide full of tips. They’ll leave their email to download it. Then, you can offer even more value in your newsletters. By automating an email campaign, you can also sell them your course.
So, initially, you created a course. Then, you wrote articles that showcase your expertise and answer your target customer’s questions. In the end, you sell your offers automatically.
Today, some people think blogging is outdated, that it’s useless because everyone prefers watching TikTok videos that last 2 minutes max.
Let me tell you, they’re completely wrong.
Sure, you can find clients on social media, but you have to understand the difference between:
- A guy scrolling through TikTok to relax (who is NOT actively looking for solutions, not in the mood to buy but to unwind)
AND
- A pro who’s doing a specific search looking for a solution to a problem they’re facing (and who lands on your well-optimized blog, grateful that you took the time to help)
You see that the mindset of your visitor is not the same at all!
And while you may need thousands of unqualified views on TikTok, your Systeme.io blog can bring you clients from the very first visitors.
So even though your presence on social media is highly recommended, having a blog can really make a difference.
Moreover, studies show this quite clearly:
- 80% of internet users interact with both social media sites and blogs. (DemandMetric)
- Companies with blogs produce an average of 67% more leads monthly than companies that don’t blog. (DemandMetric)
You’ll be able to share high-value content with your target audience, demonstrate your expertise, and ultimately make money.
Plus, you don’t need to create your own product to get there.
Nope.
You can simply share affiliate links and monetize your blog by recommending partner offers.
How to Monetize Your Blog:
Monetizing a blog involves selecting strategies that match your audience and content.
Here are some common ways to do it:
- Affiliate Marketing: Promote products through affiliate links. You earn a commission on every sale. It's simple and effective, especially if the products are relevant to your audience.
- Sponsored Posts: Work with brands to create paid content. You highlight their products or services while providing quality content for your readers.
- Display Advertising: Place banner ads on your blog. You get paid either per click or per view. This is a passive method, but it requires a good amount of traffic.
- Digital Products: Create and sell ebooks, online courses, or other downloadable content. This allows you to capitalize on your expertise while generating passive income.
- Services: Offer services related to your niche, such as consulting, web design, or content writing.
- Memberships or Subscriptions: Provide exclusive content through a subscription model. Your most loyal readers pay for access to premium resources.
By diversifying your revenue streams, you can increase your chances of success while keeping your audience engaged.
Why Use Systeme.io to Create a Blog?
Creating and managing a blog can quickly get expensive. Unless you’re a WordPress pro... or you know how to use Systeme.io!
Here’s why I think it’s the best platform for your new blog:
- It’s free to start: Even with the FREE plan, you can create your blog and start attracting traffic by publishing quality content that will attract future customers. The only limit is that you won’t be able to remove the “Systeme.io” badge at the bottom right of your blog.
- Connect all your marketing tools: Since it’s an all-in-one platform, from your blog you can directly capture leads, assign tags, follow up with your visitors via email, and send them to your sales funnels. You’re managed on one platform, and you don’t have to worry about connecting multiple tools.
- Easy to use: Between the drag-and-drop editor and the many available templates, you don’t need to be tech-savvy to create a stylish and easy-to-read blog. In just a few clicks, you create your blog, your content, and publish them online.
- Other people have done it before you: Systeme io users are already using this feature successfully :


For example: You set up your entire system on Systeme.io: training + sales funnel + email sequence + blog + tags = you’re selling even when you’re sipping mojitos with your friends.
Your tomato blog will grow as you keep posting content. Gradually, you’ll establish yourself as a reference. Your visitors will turn into customers without you having to intervene directly.
Powerful, right?
Of course, you’ll need to post original, unique, and interesting articles.
Otherwise, nothing will happen.
How Much Can You Earn with a Systeme.io Blog?
Significant amounts, potentially millions!
The more SEO-optimized articles you publish, the more qualified visitors you attract who are likely to buy. And these are future clients and affiliates...
The exact amount of income you can generate from a blog will depend on the price of your offers or the offers you promote through affiliate marketing, and of course, the number of qualified visitors.
Becoming a millionaire with your blog is possible!
But beware, it’s not easy; you’ll need to be persistent.
Recent studies show that by 2024, a blog that’s been around for 5 to 10 years will generate an average of $5,450.90 per month (Source):

Your advantage is that most bloggers who start out give up quickly. Results take too long to materialize for their liking... they lose hope and abandon their blog after a few published articles.
Yet, if you’re serious, consistent, and don’t give up, you could reach great heights and generate enough to live comfortably.
Step 1: Sign Up for Systeme.io
It seems obvious. To use Systeme.io, you need an account!
If you’re just starting out, you can stick to a free plan: you can do everything, just in smaller quantities when it comes to funnels and automations.
Then, as you sell your offers or those of others through affiliate marketing, you can invest in a Startup plan, then webinar options, etc.
Just enter your email address on this page to access all of Systeme.io's tools for free.
Is it done? Great! Welcome aboard.
Now you should see your dashboard. And in the top menu bar, several options.
We’ll only talk about blogs in this article. But don’t worry, I’ll explain everything.
(It’s better if at this point, you take the time to complete some basic information in the settings: your address, your name, how you want to be paid if you’re doing affiliate marketing, etc.).
Grab Your Free Account
Systeme.io is the world's simplest and most powerful marketing platform.
🚀 Upgrade with a subscription
Step 2: Connect a Domain Name and Professional Email to Systeme.io
It’s not mandatory because Systeme.io provides you with a subdomain for free.
It’s a customizable URL path that you can modify in your dashboard, then go to settings and finally custom domains.
Click on the three little dots at the end of the line and click on "settings" to modify this name.
You can also add a favicon: it’s the little image that appears at the top of every tab in search engines.
To appear even more professional, you can add a domain name that you’ll purchase.
For example, for your tomato blog, it could be supertomato.com! Go to a domain name provider like Namecheap, Hostinger, GoDaddy, etc. and check if the domain name you’re interested in is available. Then order it!
Then, just follow the tutorials on Systeme.io to connect it: Guide
Finally, you can create and connect your professional email address. Recently, email providers don’t want to hear about free email addresses when you use an autoresponder: you’ll end up in spam. So, you need a professional email address (with your domain name) to send emails with Systeme.io.
You’ll also need to confirm it on Systeme.io: Confirm Email
You can use this video if you need a step-by-step guide:
Feel free to search on YouTube; there’s a ton of helpful content.

TIPS :
Here are 13 pro tips for choosing your domain name:
- Use a .com extension: It’s the most common and credible extension for users.
- Keep it short and simple: A short name is easier to remember and type.
- Avoid hyphens, numbers, and double letters: These elements can be confusing.
- Be unique and aligned with your brand: A distinct name strengthens your brand identity.
- Add relevant keywords: Incorporate keywords related to your business to improve SEO.
- Think about local keywords: If your business is local, including a location can be an advantage.
- Research to avoid brand conflicts: Make sure your name isn’t already taken to avoid legal issues.
- Ensure the domain is easy to type and pronounce: This makes it easier for word-of-mouth and memory.
- Avoid vague or generic options: A specific and clear name is more effective than a too-general one.
- Consider alternative extensions: If .com is taken, consider other extensions like .net or .co.
- Ensure the domain is unique: A unique domain avoids confusion with other sites.
- Capture attention with keywords: Punchy keywords can grab attention.
- Act fast to reserve the domain: Good domain names sell quickly, so don’t wait too long.
Source : HubSpot Guide
Step 3: Create Your Blog on Systeme.io
Now that you have your account and maybe even your custom domain + pro email, let’s dive into the main event.
Let’s create your Systeme.io blog step by step!
Go to the Blogs tab and click on Create in the top right corner:

On the next page, give your blog a name and select a domain name for your blog:

You’ll also customize the URL path: you can leave it as is or add a path like /blog if you prefer to use your domain name to create a showcase page or host your main sales funnel.
Whatever you decide, this URL is where your blog homepage will be accessible.

Then you can preview the templates and choose the one that suits you best to start with.
Click Save, and voila, your blog is created!
TIPS :
Here’s a summary of blog design tips according to Surfer SEO:
- Readability: Choose simple fonts, clear sizes, and ample spacing.
- Consistency: Use uniform colors and styles to strengthen your brand.
- Mobile-first: Ensure your blog is optimized for mobile devices.
- Easy navigation: Simplify menus and navigation options.
- Visual hierarchy: Use headings, subheadings, and contrasts to guide the reader.
- Scannability: Structure content into short sections with subheadings.
- Internal search: Add a search bar so visitors can easily find what they’re looking for.
Source : Surfer SEO
Step 4: Customize Your Systeme.io Blog Design
Now your blog is created on your Systeme.io account: you’ve given it a name, a domain, and chosen a design.
By default, it will come with several pages and articles to help you get started. However, all of these parts can be modified!
You can adapt the design of the parts that will be displayed no matter your content:
- Header and footer: The bars at the top and bottom of your blog
- Post list page: How your blog posts are displayed
- Post layout: How your blog articles will be displayed
Try to keep it simple and consistent at this stage. Use the same colors, fonts, and logos.
Customize the global settings of your Systeme.io blog:
Go to the Blog Layout tab to customize the header, footer, font, its size, and its color:

The layout page of your blog will open, and you can personalize everything you find there:

I recommend starting in the settings to adjust:
- Fonts
- Link, font, and background colors
- Text and title sizes
To keep it simple: stay as straightforward as possible. Use fonts and colors that are easy to read.
Don’t forget to check if the mobile version is optimized too!

And you’ll do this for all the pages of your Systeme.io blog!
More and more visitors are viewing our blogs from a mobile device and not a PC, so it’s ULTRA important that you spend time on the responsiveness of your content.
By customizing your blog's layout settings, you’ll apply the same settings to your entire blog.
However, you’ll still be able to modify each element individually and also every page or article globally.
It’s just a time-saver to standardize your branding.
Customize the Header:
Usually, the header of a blog includes:
- Your logo (which you can quickly create on Canva or a logo generator by AI Logo Generator)
- A menu to navigate your blog
- A search bar (which isn’t available yet on Systeme.io, but I’m sure it will come someday; in the meantime, you can use Google Programmable Search)
TIPS :
Link your blog’s homepage to your logo to help visitors quickly return to the start:

Customize the Footer:
The footer of your Systeme.io blog can include:
- Your logo + slogan
- Legal links (terms and conditions, privacy policy, etc.)
- Reminders of important links
- A contact/about page link
This is just an example; I encourage you to visit several sites to decide what inspires you and what you’d like to highlight in these sections.
In any case, make sure to standardize the colors and fonts!
TIPS :
Place a form to subscribe your visitors to your newsletter directly in your footer!

Remove the Affiliate Badge from your Systeme.io Blog:
In your blog layout settings, you can disable this option ONLY if you have a paid plan.
It allows you to earn affiliate commissions if your visitor clicks on it and subscribes to Systeme.io (click here for more info: Systeme.io Affiliate Program)
Add Google Analytics:
By adding your Google Analytics tracking code to your Systeme.io blog, you’ll better track your visitors:
- How many are there?
- Where do they come from?
- Are they increasing or decreasing?
Follow this step-by-step tutorial to help you install Google Analytics on your Systeme.io blog: Google Analytics Setup.
With this, you can improve your content by adapting to your visitors' behavior, and you can also retarget your future customers with Google Ads.
As always, before leaving a page, make a habit of checking the mobile version and saving your changes!

Customize the Post List Page:
This is the page where your visitors will click to view all your blog articles.
It should present your posts clearly and pleasantly, but it’s also an opportunity to add some info:
- Place important links
- Promote your offer
- Encourage newsletter signups
- Redirect to your community (Facebook group, Telegram, etc.)
To do this, nothing could be simpler.
Click on the Post List Page:

Then personalize how you want your posts to be displayed and add whatever you want.
Here’s an example of what you can do:

You can customize the layout of the posts, as well as the font sizes and colors. Keep it simple so it’s easy to read.
By placing two columns on this page, you can also add rows to the right to place different elements.
For example, I added a background image to my newsletter signup row!
Check out this page live: Example Posts
Customize the Post Layout:
You’ll first need to click on Posts and then Post Layout to customize this section:

On my template, there’s a big author headshot 🙃 and that’s not what I want:

So I’m going to put back the newsletter signup row because that’s what matters most to me with this blog.
TIPS :
To replicate a design from one page to another, save it as a block!
A master block allows you to modify the design wherever it’s found, while a simple block lets you import it and modify it without affecting others on different pages. This is important to remember to avoid breaking a specific layout!


Then just click on Blocks in the top left, then My Blocks, and drag your block wherever you want!
You can also let your imagination run wild by encouraging your visitors to share your article, for example:

Never delete the grayed-out elements because they are what import the elements of your post each time...
We’ll see a bit later how to offer your content sharing for free on social networks 🫡
Step 5: Understand Blog Pages vs. Blog Posts/Articles on Systeme.io
I still see too many users confusing posts and pages in blogs, regardless of the platform.
So, let’s pause for a moment to define them and avoid mistakes!
What's a Systeme.io Blog Pages:
These are the static sections of your blog. They are updated, but their content doesn’t really change; they don’t provide news, just important info you want to share, such as:
- Blog homepage
- About page if you want to introduce your brand or yourself
- Contact page if you want to place a contact form
- Shop page if you want to create a shop directly on your blog (you’ll link your funnels behind the buttons!)
- Legal pages: Terms & Conditions, Privacy Policy...
These pages will be accessible via your menu and possibly in the footer of your blog!
What's a Systeme.io Blog Post/Article:
In contrast to pages, posts are dynamic content that is published regularly.
These are the posts that will be listed on the blog page.
It’s important to categorize them if you want to help your visitors navigate your content.
Moreover, you can add, modify, or delete categories simply by clicking on categories.

Remember to complete the SEO elements each time:

Why Posts and Pages are Important for Your Systeme.io Blog:
While pages establish the structure of your blog and make it look professional, posts are the elements that will generate traffic. They are vital for your SEO.
Don’t neglect either if you want to please Google and ensure good ranking. For example, Google likes to find your legal pages easily.
You can download templates from the template library by the way: Templates
Then save all sections as blocks to import them onto your blog pages!
Step 6: Add and Customize Content on Your Systeme.io Blog
Now that we’ve created the overall design of our blog and set up tracking for visits, it’s time to start adding your content!
I invite you to think about the structure of your blog beforehand to have a clear idea of the result you’re aiming for. This is the best way to build a blog that’s easy to navigate and enjoyable to read.
This is called creating a sitemap.
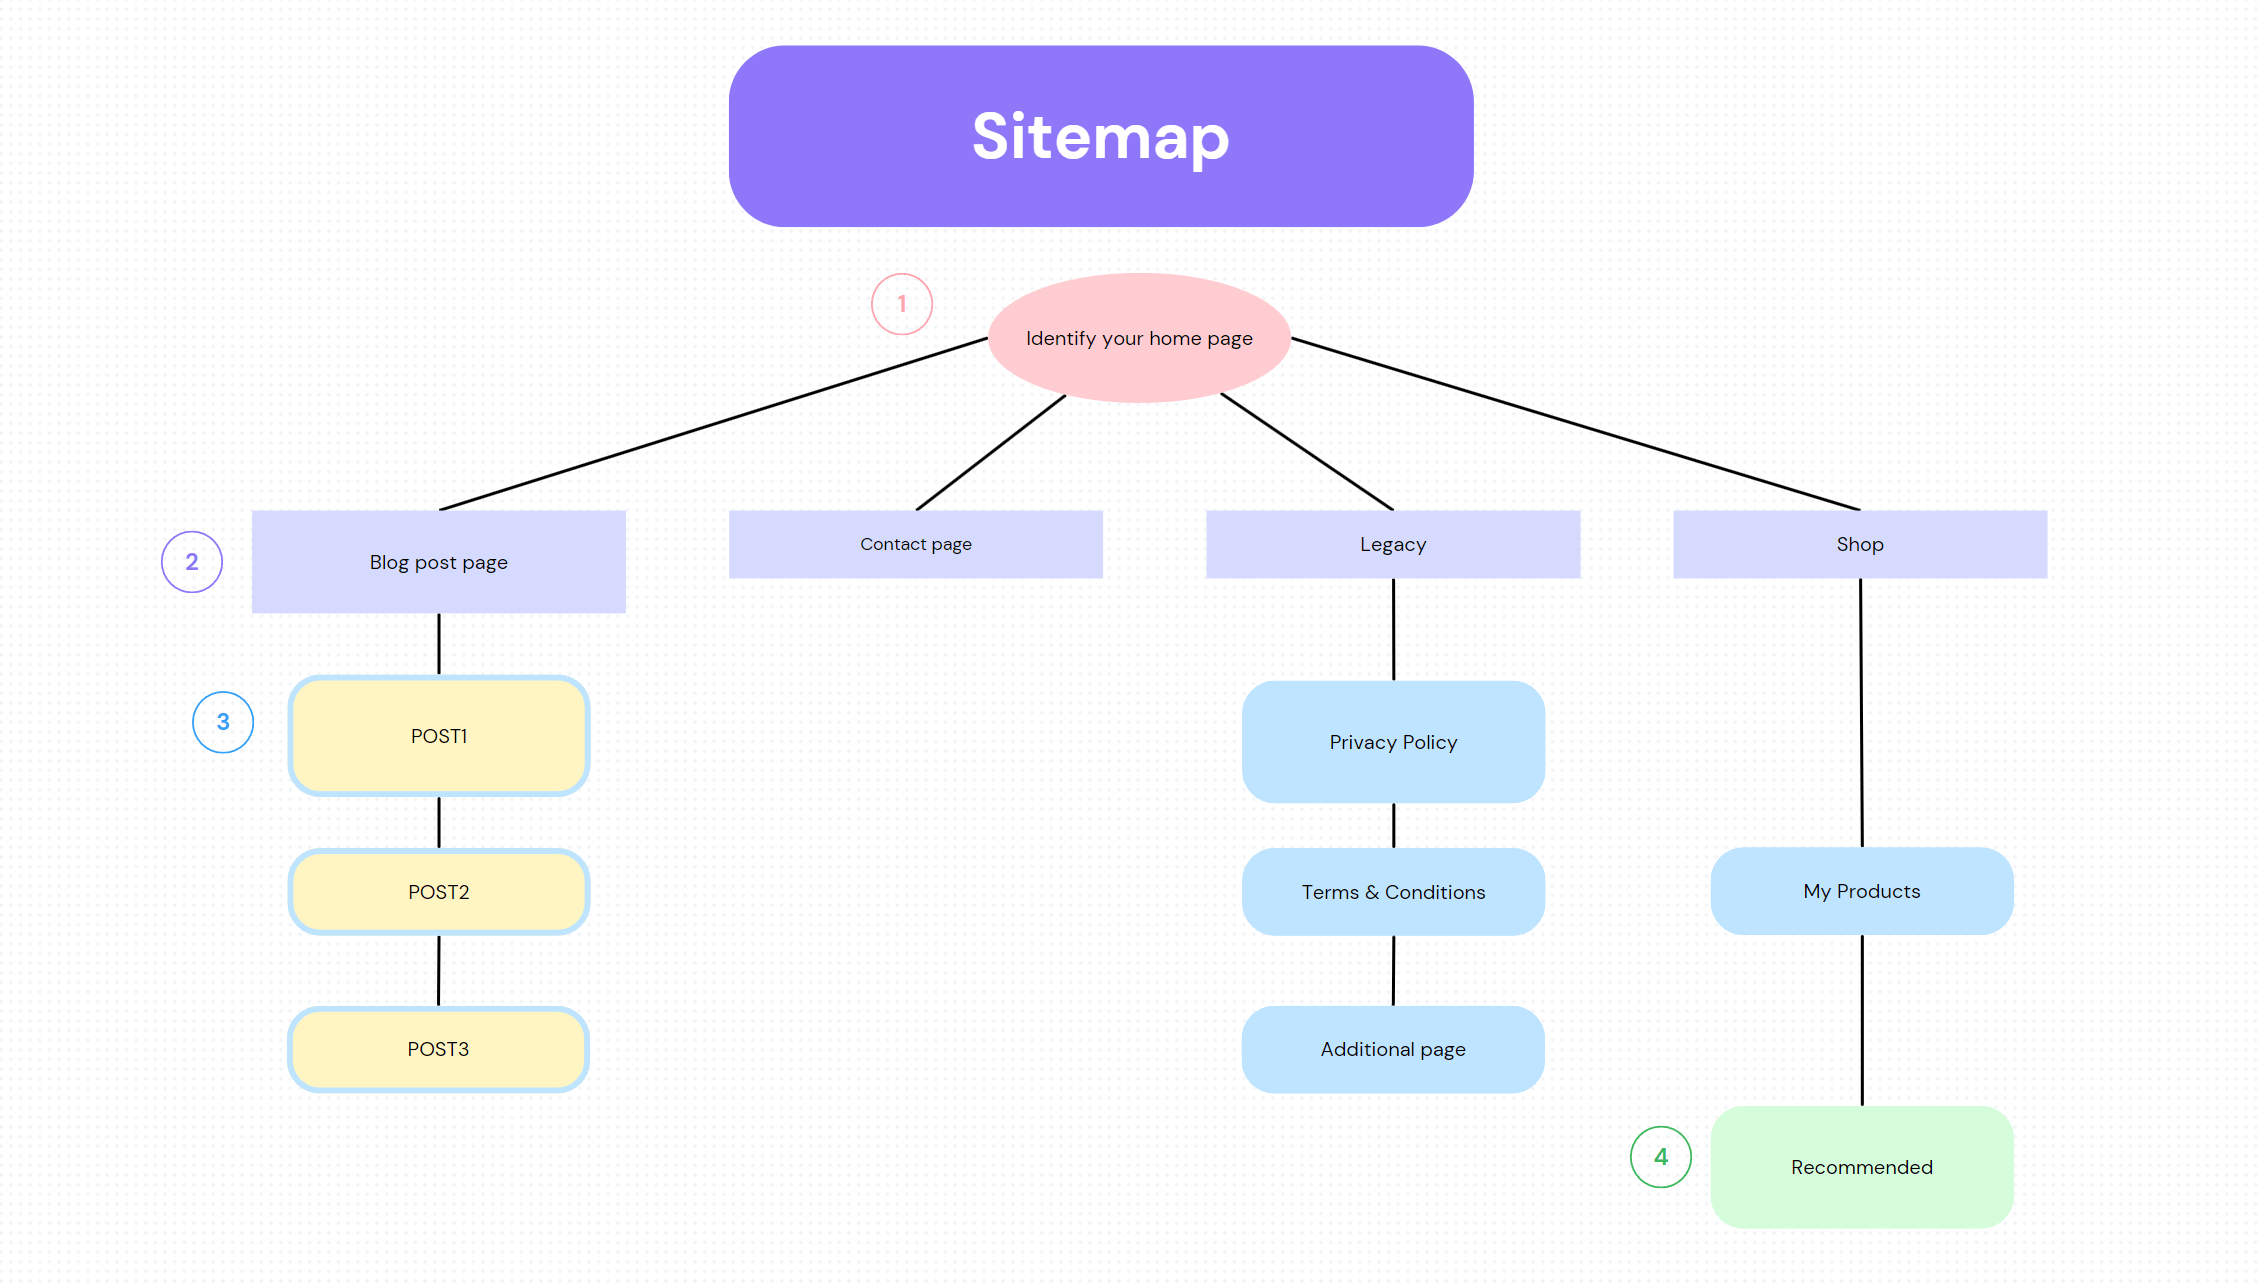
Here’s an example of a sitemap you can customize on Canva >>
Once that’s done, and you have a clear idea of what you want to achieve, you can get started!
TIPS :
Here’s a summary of the 13 best practices for blog design according to Orbit Media:
- Add a search bar: Allows users to quickly find content.
- Display the author’s name and photo: Humanizes the content and strengthens the connection.
- Include the publication date: Useful for time-sensitive content.
- Use share buttons: Encourages sharing on social networks.
- Place call-to-action buttons for subscriptions: Encourages newsletter signups.
- Display related articles: Encourages internal navigation.
- Include a comment section: Stimulates engagement and discussions.
- Display the estimated reading time: Informs readers of the duration.
- Use progress bars: Indicates reading progress.
- Add print buttons: Handy for those who prefer paper format.
- Use filters: Organizes articles for easy search.
- Include breadcrumbs: Improves navigation.
- Design clear typography: Prioritizes readability with appropriate font sizes.
Source : Orbit Media
Customize the Home Page:
All pages work the same way on Systeme.io: with a drag & drop editor.
So, once you know how to do it once, you know how to do it everywhere!
- A section contains lines where you can add text, titles, images, buttons, carousels, videos, bullet points, content boxes, FAQs, HTML/JS/CSS code, etc.
- You can adjust the internal and external margins of all elements, center them, or align them to the left, right, or center.
- You can preview the mobile version and modify it by clicking on the phone icon at the bottom left of each page.
- You can save blocks to reuse them easily on other pages. (A block lets you import and modify the block, while a master block allows you to modify the block on one page, updating it on all pages where it’s imported.)
- You can duplicate any element with just one click.
- At the top left, you can modify the page settings: tab name, meta description, keywords, author, social media sharing image, header and footer code, show/hide Systeme.io badge (only on paid plans), hide or display the page in search engines, default language, text and title colors, fonts, and Facebook events for tracking.
- At the top right, you can save your changes (there are also automatic saves) and preview your page while you work.
Now you need to spend some time on this editor to get the hang of it and design your pages! And that, you can only do by practicing; there are no shortcuts...
What I recommend is not to stray too far from your original design to avoid glaring errors in your layout... your template was thought out by a pro, so take advantage of it!
So, you’ll click on each text area to modify it: be sure to adopt impactful copywriting! Use simple and short sentences that quickly explain to your visitors what they’ll gain from visiting your blog.
You’ll also modify the pictures, remove them, add new ones... experiment with the drag & drop editor to perform all these tasks!
Settings to Adjust on Your Blog Pages:
Each time, remember to click on Settings to rename and present your page:
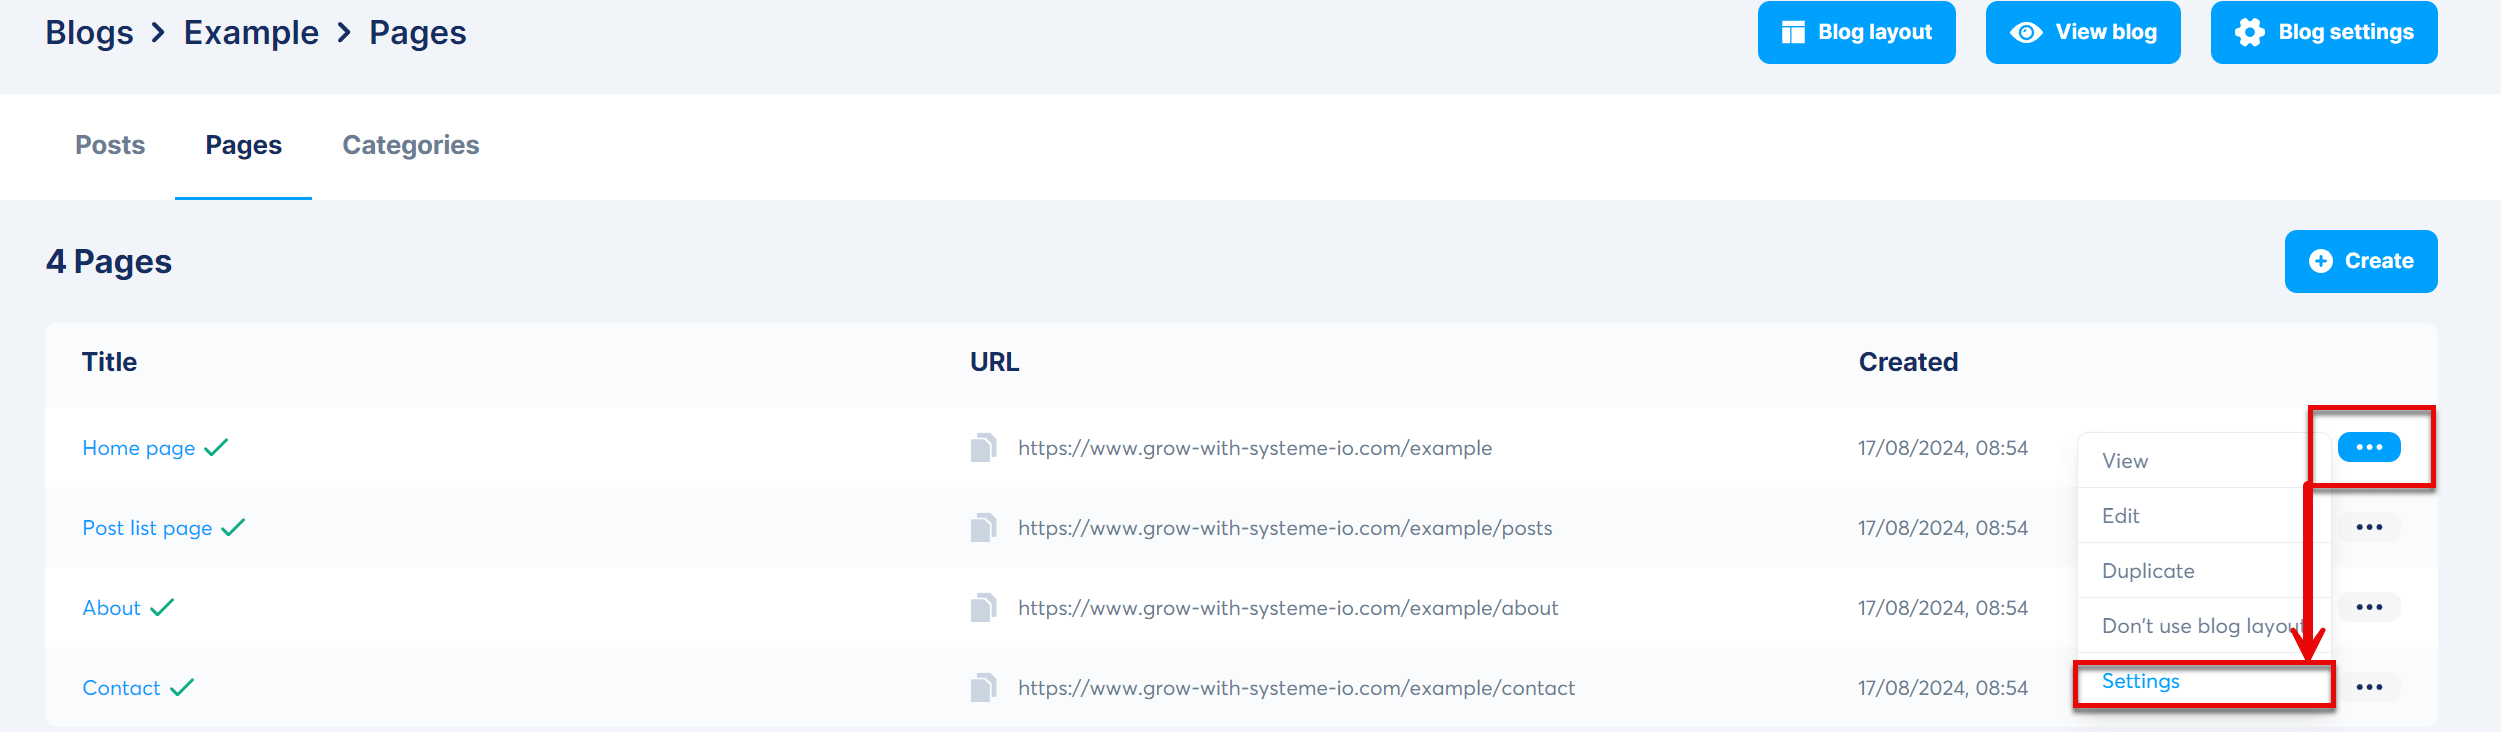
And for each page and article, you’ll also need to click on Settings from the editor to complete all the fields that will improve your SEO and help your visitors find you:

Add More Pages to Your Blog:
To add more pages to your blog, you have two options:
- Create a new page and add everything from scratch, with or without using the blog layout

- Duplicate a page you’ve already made to save time and avoid starting from scratch – in this case, remember to modify the SEO fields and the URL path!

Once you’ve modified and added all the blog pages you wanted and optimized them, you can start writing your first blog post!
Add a Blog Post on Systeme.io:
Go to the Posts tab of your blog to create your first article:

By default, you’ll have several published articles:
- You can delete them and start from scratch
- Or keep one and modify it to get inspired by its layout.
There’s no better way than the other; it’s up to you!
For this example, let’s say you want to create a new one: click on Create and fill in the required fields.

They’re ALL important, so do it right.
The image you place here will be the one displayed in your article list, as well as the description and summary.
To optimize your SEO, you’ll need to go into your article and fill in the Settings fields we’ve seen before.
Once you’ve clicked Save, your post will appear in the list.
You can click on its name or the three dots on the right to enter the editor and start writing!
Attention: Use H1, H2, and H3 meta tags correctly to better rank your blog!

You can add a table of contents to help your visitors navigate your article (and help Google understand its topic 🤩 )
Reminder: To modify the general layout of your blog posts, you need to go to Post Layout from the article list!
If you add images to your article, make sure they’re high quality, unique, and in a format that won’t slow down your page (WebP or JPEG).
TIPS :
Adding Images to a Blog (best practices) :
- Resize images: Reduce image size without compromising quality to improve loading time.
- Optimize filenames: Use relevant and descriptive keywords for filenames.
- Add alt tags: Describe images for search engines and visually impaired users.
- Make images mobile-friendly: Ensure images are responsive and adapt to mobile devices.
- Optimize image titles: Use descriptive titles including keywords.
- Use captions: Enhance user experience by adding captions under images.
- Prefer unique images: Use original images rather than stock images to improve SEO.
- Complete the image text: Ensure the page text supports and explains the images.
Source : Orbit Media
Now that your post is ready, be sure to check the mobile version.
Then save it before leaving the editor; you just need to publish it or schedule it!

Step 7: Optimize Your Blog for SEO and Engagement
Are you pretty happy with the result so far?
💡 To improve it even further, take a step back: put yourself in the shoes of your target customer and ask yourself if your blog inspires confidence and provides enough value.
Now it’s time to make sure your visitors find your blog!
TIPS :
Here’s a summary of the 13 tips for writing an SEO-optimized blog post according to HubSpot:
- Start with keyword research: Find the terms your target audience is searching for.
- Use headings and subheadings: Make reading easier and improve SEO.
- Optimize for featured snippets: Write clear and concise answers.
- Write for humans: Prioritize the user experience while integrating SEO.
- Optimize your title: Grab attention with keywords.
- Add keywords to the meta description: Increase visibility on search engines.
- Add alt tags to images: Optimize images for SEO.
- Avoid keyword stuffing: Stay natural in keyword integration.
- Link to authority sites: Boost the credibility of your content.
- Write long, scannable articles: Google favors detailed content.
- Link to other articles on your site: Improve internal navigation and SEO.
- Compress images: Improve loading times.
- Develop a link-building strategy: Attract external links to boost SEO.
Source : Hubspot
Here’s what you need to implement each time to ensure your Systeme.io blog is well-referenced on search engines.
And to check if your strategy is working, we’ve already explained above how to track your visitors with Google Analytics and Facebook Pixel.
Finally, one of the best ways to naturally attract traffic is to encourage your visitors to share your article on social media!
Promote Social Media Sharing:
Systeme.io doesn’t yet offer advanced tools for sharing articles on social media, but that’s okay.
In fact, you can use a completely free tool that will give your blog posts a fresh boost.
It’s called ShareThis :

Sign up for free, add your domain, and customize one of the available tools.
Then, you’ll be able to copy your JavaScript code and install it:
- In your blog's header to activate it on all your blog pages

- In the post layout to add it to each article you publish

Thanks to these little code snippets, it will be easy and fun for your visitors to share a page or an article from your blog on their social media, giving you free advertising!


You can also add a Facebook comments bar to encourage your visitors to comment using their Facebook profile.
It’s super simple; don’t worry about the link requested and just drag this element to the desired place, for example, in your post layout!

Step 8: Grow Your Blog with Systeme.io
OK, this is great!
Now your blog is created, optimized for SEO, and ready to be shared with the world.
The advantage of having created it on Systeme.io is that now you can link it to all your marketing tools to generate more sales and/or affiliate commissions.
Systeme.io Blog and Email Marketing:
You’ll be able to subscribe your blog visitors to your email list and keep them engaged to turn them into loyal customers.
To do this, we’ve already talked about adding a newsletter signup form.
To be able to send them emails later, you need to assign them a tag through workflows!
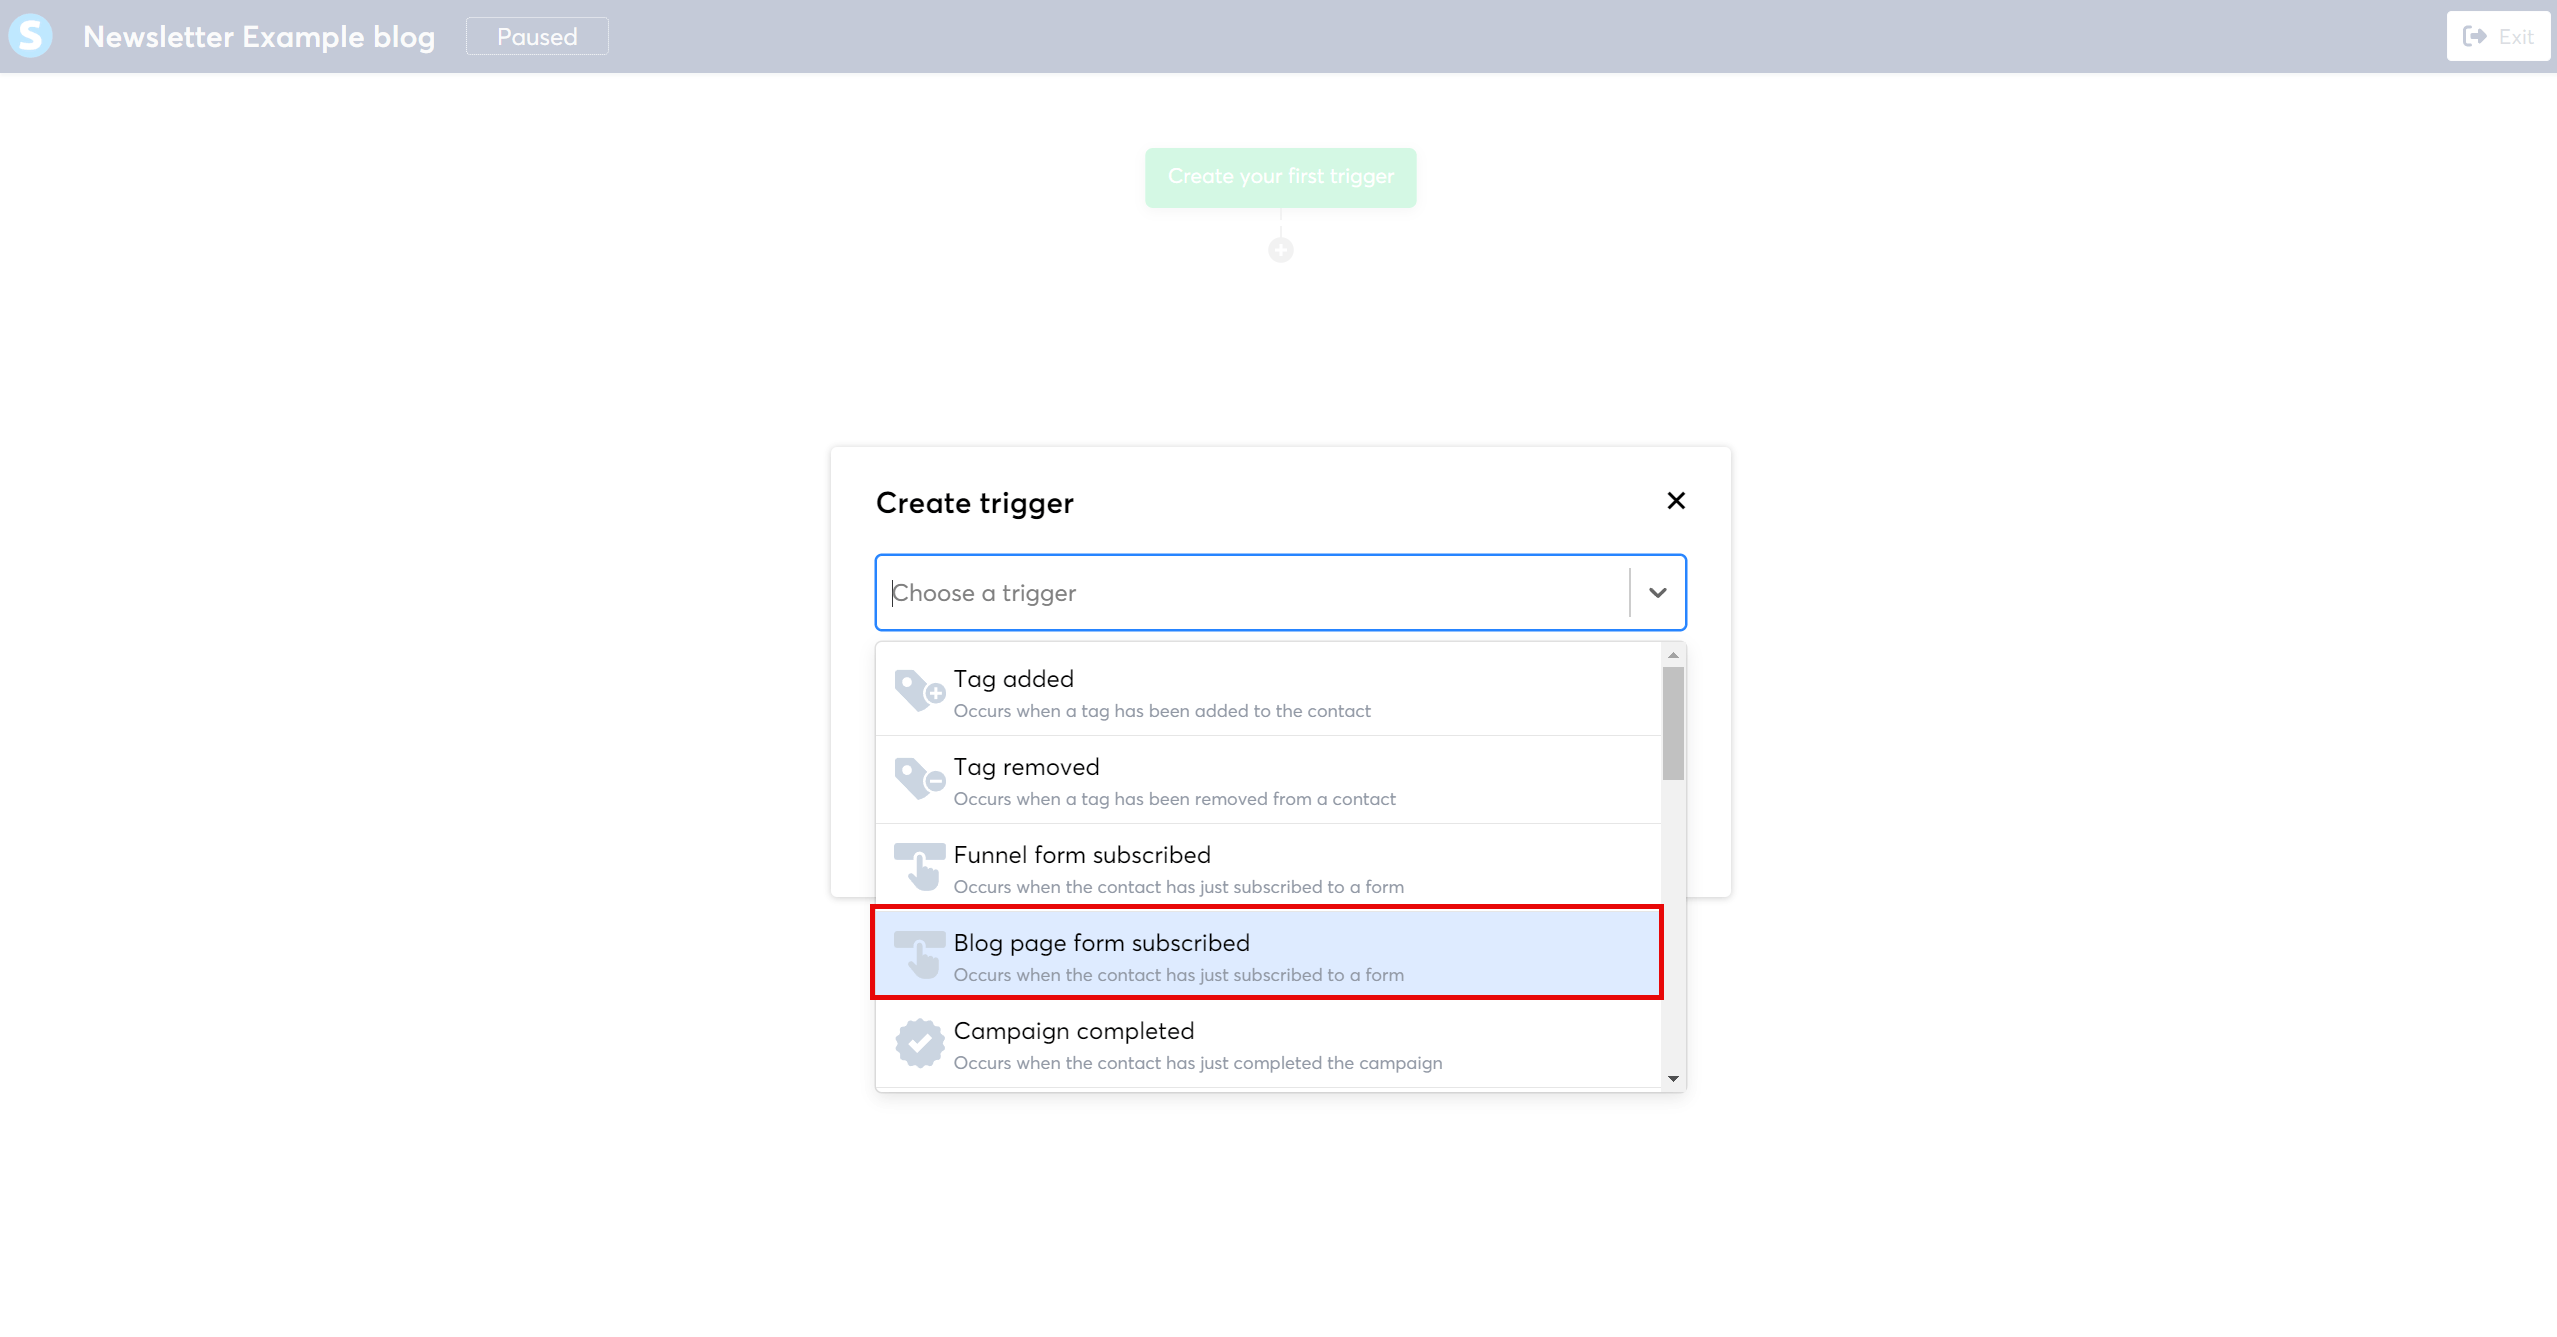
Add an automation so that every visitor who subscribes to your blog gets a tag, and the ultimate is to send them a Know-Like-Trust email campaign right away. This will allow you to introduce yourself and build trust! Know-Like-Trust

Another powerful way to capture emails on your blog is to offer a lead magnet. You’ll add popups that offer your visitor a free gift that will help them even more to solve their problem, in exchange for their email:

With this lead magnet, you’ll capture even more emails that you can monetize through your newsletters and email marketing campaigns.
Systeme.io Blogs and Sales Funnels:
If you sell your own offers, you’ll easily be able to redirect your visitors to your funnels – by placing buttons, links, and a shop page, for example.

It’s an excellent way to bring them into your ecosystem: they came to your blog because they had a problem to solve, so it’s the best time to sell them your solution!
Systeme.io Blogs and Memberships:
Another way to monetize your blog is to use it to redirect your visitors to your paid membership. It’s where you’ll deliver high-value content, reserved exclusively for your most engaged subscribers.
For this, you’ll need to create your community in advance and share it automatically with your subscribers after their purchase on your sales page.

Here are some examples of how you can connect your blog to your other Systeme.io marketing tools to grow and monetize it!
Conclusion About The Blog On Systeme.io
We’ve finished this tutorial on how to create and monetize a blog on Systeme.io.
I hope you got all the information you needed? If not, feel free to ask questions in the comments!
Key Takeaways:
- With 77% of internet users still reading blogs, their potential is still enormous, and you should definitely be interested (source: Social Media Today)
- Thanks to Systeme.io, you can create your first blog for free.
- To stand out among the millions of blogs that are created each year, you’ll need to write quality content and optimize your SEO.
- The advantages of creating your blog on Systeme.io are numerous: it’s free, it’s simple (thanks to the drag & drop editor), and you can connect your blog to all your marketing tools.
Now it’s time to get started!
You’ll probably be tempted to use AI tools like ChatGPT, so I need to tell you a few things.
Google doesn’t penalize content created by AI, but it does penalize content that tries to cheat the algorithm by forcing keywords and blacklists blogs that don’t provide enough value.
So, if you want to use AI to create your blog posts, I encourage you to always enhance the output to make it more human, correct any possible errors, and check that the text isn’t too artificial.
You can also use tools like Quillbot AI Content Detector to quickly check if your article is detected as AI-generated or not.
Now you can directly create your blog on Systeme.io by creating a free account right here >>
FAQ on Creating and Monetizing a Blog with Systeme.io
Still have questions about the Systeme.io blogging ?
I’ve gathered the most common ones here:
A blog is an online space where you regularly publish articles to share knowledge, tips, or opinions.
It helps you become visible on Google when prospects search for solutions to their problems.
For example, if you sell tomato-growing courses, a blog allows you to capture the attention of people searching for information on that topic, convert them into subscribers, and then into customers.
Systeme.io allows you to create a blog for free, without needing plugins, hosting, or advanced technical skills.
It's an all-in-one platform that integrates lead capture tools, sales funnels, and email marketing while being easy to use thanks to its drag-and-drop editor.
No, you don’t need a paid subscription to create a blog on Systeme.io.
The free plan allows you to create a fully functional blog.
However, some advanced features, like removing the "Powered by Systeme.io" badge, are only available with paid plans.
The main difference is the ability to remove the affiliate badge at the bottom of your blog, which is not possible with the free plan.
With a paid subscription, you can further customize your blog, access more features, and have increased flexibility for your site’s branding.
Blog income depends on the quality of your content and the number of qualified visitors.
With persistence, a well-established blog can generate significant monthly income.
For example, a blog that's been around for 5 to 10 years can earn an average of $5450.90 per month.
- Affiliate Marketing: Recommend products and earn commissions.
- Selling Digital Products: Offer eBooks, courses, or PDFs directly on your blog.
- Services: Use your blog to showcase your expertise and attract clients for services like coaching or website creation.
- Google Ads : sell space on your blog to display ads
No, Systeme.io provides a free subdomain.
However, for a more professional appearance, you can purchase and connect your own domain.
Yes, you can integrate these tools to track visitor behavior and retarget potential customers with ads.
Read more here : help.
Optimize each page and post by using relevant keywords, meta titles and descriptions, and compressing images to improve load times.
Additionally, create quality content and structure your posts with H1, H2, and H3 tags.
Yes, Systeme.io allows you to customize the design of your blog, including the header, footer, and post layout. You can standardize your branding by adjusting colors, fonts, and logos.
Use free tools like ShareThis.com to add share buttons to your posts. This makes it easy for visitors to spread your content on social media.
A blog attracts visitors who are actively searching for solutions to their problems, unlike social media where users' attention is more scattered. Additionally, a blog allows for more effective lead capture through SEO and sign-up forms.

You'll learn even more from the training videos, and show the world that you're a proven expert.
Congratulations on completing this full tutorial on how to create a free funnel on Systeme.io!
You're one of the few people who are truly committed to their success, and that's the most important thing if you want to move towards financial freedom.
Don't hesitate to ask your questions below, I'd be delighted to answer them. 👇
Don't forget to share this post !
Read more posts :
Grab Your Free Account
Trusted By Over 350,000 Entrepreneurs Across The World

Sales Funnels
Transform visitors into paying customers with effective sales funnels.


Countdowns
Encourage urgency with countdown timers for offers.

Add-On Sales
Add upsells, downsells and order bumps to sell more products.

Website Builder
Design a stunning website exactly how you envision it.

Drag&Drop Editor
Optimize your content by running A/B tests on pages and emails.

Workflows
Automate your marketing efforts with powerful workflows.

CRM
Organize contacts, manage deals, and more with an intuitive CRM.

Email Marketing
Connect with your audience through targeted email campaigns.

Analytics
Utilize detailed analytics to grow your business effectively.

Store Funnels
Simplify selling physical products with store funnels.

Course Creation
Monetize your expertise by creating and selling online courses.

Membership
Generate recurring income by setting up membership sites.

Landing Pages
Build high-converting landing pages for your site or funnels.

Blog Creation
Establish your authority with a professional blog from templates.

Integrations
Connect a variety of popular tools to enhance functionality.

API
Integrate your tech stack seamlessly with API & webhooks.

Global Products
Create a product once and sell it across multiple funnels.

Support
Always find some help when you need with support & community
Trusted By Over 350,000 Entrepreneurs Across The World
Sales Funnels
Transform visitors into paying customers with effective sales funnels.
Countdowns
Encourage urgency with countdown timers for offers.
Add-On Sales
Add upsells, downsells and order bumps to sell more products.
Website Builder
Design a stunning website exactly how you envision it.
Drag&Drop Editor
Optimize your content by running A/B tests on pages and emails.

Community
Build and manage a thriving community effortlessly.
Workflows
Automate your marketing efforts with powerful workflows.
CRM
Organize contacts, manage deals, and more with an intuitive CRM.
Email Marketing
Connect with your audience through targeted email campaigns.
Analytics
Utilize detailed analytics to grow your business effectively.
Store Funnels
Simplify selling physical products with store funnels.
Course Creation
Monetize your expertise by creating and selling online courses.
Membership
Generate recurring income by setting up membership sites.
Landing Pages
Build high-converting landing pages for your site or funnels.
Blog Creation
Establish your authority with a professional blog from templates.
Integrations
Connect a variety of popular tools to enhance functionality.
API
Integrate your tech stack seamlessly with API & webhooks.
Global Product
Create a product once and sell it across multiple funnels.
Support
Always find some help when you need with support & community
Created with © systeme.io